AWS Big Data Blog
Aurora PostgreSQL zero-ETL integration with Amazon SageMaker
When you need quick insights from your Amazon Aurora PostgreSQL operational data, traditional analytics approaches force you to build complex extract, transform, and load (ETL) pipelines. These pipelines introduce latency, operational overhead, and data silos, which slow down decision making and increase cost. AWS introduced the support for Amazon Aurora PostgreSQL zero-ETL integration with Amazon SageMaker, providing near real-time data availability for analytics workloads.
The zero-ETL integration automatically replicates the data from your Amazon Aurora PostgreSQL database into a target AWS Glue managed catalog, where it’s available as Apache Iceberg tables. You can then analyze this data through Amazon SageMaker alongside data from other sources using your preferred analytics and machine learning (ML) tools. The data is compatible with Apache Iceberg open standards, so you can use SQL, Apache Spark, business intelligence, and artificial intelligence and machine learning (AI/ML) tools.
In this post, you explore the benefits of this integration, the architectural concepts, and the underlying change data capture (CDC) mechanics. You also go through the setup process and learn how to query your Aurora PostgreSQL data in Amazon SageMaker AI.
Zero-ETL in the lakehouse architecture
The lakehouse architecture of Amazon SageMaker AI brings together data across Amazon Simple Storage Service (Amazon S3) data lakes and Amazon Redshift data warehouses. Because it’s built on open standards, you can build analytics and AI/ML applications on a single copy of data, without moving it between systems.
Amazon SageMaker AI uses AWS Glue Data Catalog and AWS Lake Formation to provide integrated access controls across S3 data lakes and Amazon Redshift data warehouses from a single governance plane.
Understanding change data capture mechanics
At its core, Aurora PostgreSQL zero-ETL integration is powered by CDC. CDC continuously monitors the database transaction log and streams every insert, update, and delete to a downstream target in near real time.
Aurora PostgreSQL uses enhanced logical replication as its CDC engine. Standard PostgreSQL logical replication publishes row-level changes from the write-ahead log (WAL). The enhanced logical replication in Aurora offers added capabilities that make it well-suited for zero-ETL integrations, including automatic DDL propagation and continuous streaming of transactional changes.
Solution overview
With Amazon Aurora PostgreSQL zero-ETL integration with Amazon SageMaker AI, you can:
- Remove ETL complexity – Automatically replicate data without building custom ETL pipelines.
- Near real-time analytics – Access operational data in Amazon SageMaker AI within seconds of changes in Aurora PostgreSQL.
- Unify data analysis – Combine Aurora PostgreSQL data with data from other sources in a single lakehouse architecture.
- Reduce costs – Minimize operational overhead and infrastructure costs associated with maintaining ETL pipelines.
- Accelerate insights – Query data using familiar SQL tools and integrate with ML workflows in Amazon SageMaker AI.
The following diagram illustrates the architecture of this solution:
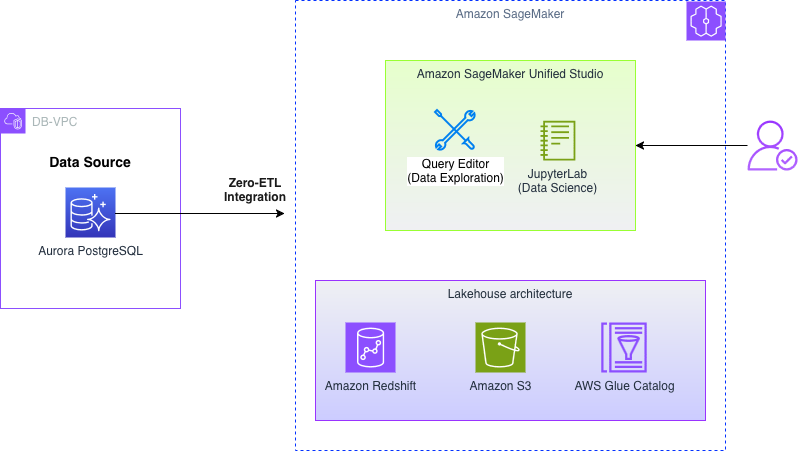
Figure 1: Architecture of the Aurora PostgreSQL zero-ETL integration with Amazon SageMaker
The workflow includes the following steps:
- Your application writes data to an Amazon Aurora PostgreSQL database cluster.
- The zero-ETL integration automatically captures changes from the Aurora PostgreSQL database.
- Data is replicated to the target AWS Glue managed catalog in near real time.
- You can query and analyze the data using Amazon Athena, Amazon Redshift, or other analytics tools integrated with Amazon SageMaker AI.
- Data scientists can build and train ML models using Amazon SageMaker AI with direct access to the Apache Iceberg tables in the target AWS Glue managed catalog.
Prerequisites
Before setting up the zero-ETL integration, verify that you have the following:
- An Amazon Virtual Private Cloud (Amazon VPC) setup with the proper networking configurations for database connectivity.
- An Amazon Elastic Compute Cloud (Amazon EC2) security group set up and an allowed DB instance port connection to the source and target DB instances.
- AWS Command Line Interface (AWS CLI v2) installed and configured with the appropriate AWS Identity and Access Management (IAM) credentials and permissions to interact with Amazon Aurora and SageMaker AI.
- Sufficient AWS service quotas for Aurora PostgreSQL resources.
Configure the source PostgreSQL database for zero-ETL integration
When you have all the prerequisites in place, you can configure the source PostgreSQL database for zero-ETL integration.
Create a custom Aurora PostgreSQL cluster parameter group
Your Aurora PostgreSQL database needs to have parameters configured for real-time replication. In this section, you will create the DB cluster parameter group and configure parameters. For more information, see Getting started with Aurora zero-ETL integrations.
Use the following AWS CLI command to create an Aurora PostgreSQL cluster parameter group:
Now set the parameters by modifying the parameter group:
The parameter group is now fully configured and ready to be applied to your Aurora PostgreSQL cluster.
Select or create a source Aurora PostgreSQL cluster
If you already have an Aurora PostgreSQL cluster, you can use it, or you can create a new Aurora PostgreSQL cluster.
Note: Your source DB cluster must be running a supported version of Aurora PostgreSQL. For a list of supported versions, see Regions and database engines supported for Aurora zero-ETL integrations.
While creating an Aurora PostgreSQL cluster, use the parameter group (aurora-pgsql-zetl-cluster-pg) you created earlier:
Note: Throughout this post, make sure to replace the with your own information.
If you’re creating a new Aurora PostgreSQL cluster, wait for your DB instance(s) to be in an “Available” status. You can verify DB instance status by using the describe-db-instances API call:
Reboot the cluster to apply parameter changes
A cluster reboot is needed before zero-ETL integration can function correctly:
Wait until the cluster and the primary instance are back in Available status. For more information, see reboot-db-instance.
Create a target AWS Glue managed catalog
With your source PostgreSQL database configured for enhanced logical replication, the next step is setting up your target Amazon SageMaker AI. Zero-ETL integration uses AWS Glue Data Catalog backed by Amazon Redshift managed storage as its target. To have this functionality, you need to create a managed catalog, configure IAM permissions for Amazon SageMaker AI to access and query the managed catalog, and set up authorization for incoming integration requests from your source database.
Create an AWS Glue managed catalog
You must create a new catalog (if it doesn’t exist already) managed by AWS Glue to store table metadata and serve as the landing zone for your replicated datasets. Zero-ETL integration streams the data into Amazon Redshift managed storage, and AWS Glue keeps track of table definitions so that tools such as SageMaker AI, Athena, and Amazon Redshift Spectrum can query the data.
Create an IAM role for AWS Glue and Amazon Redshift to access the AWS Glue managed catalog
Now, use the following command to create an IAM role so that AWS Glue and Amazon Redshift can interact with the catalog. This role serves two key functions: It allows AWS Glue and Amazon Redshift to perform catalog operations, and it authorizes incoming integration requests from your source database.
Next, attach a policy to this IAM role that provides the minimum required permissions for AWS Glue and Amazon Redshift. This policy should also include the necessary permissions for encryption key actions to help maintain secure data handling throughout the integration process:
Set up AWS Lake Formation access
Before using the managed catalog for zero-ETL integration, you must configure data lake administrators in AWS Lake Formation who have administrative or read-only permissions on the managed resources. Additionally, you need to grant ReadOnlyAdmin permissions to the Amazon Redshift service-linked role, AWSServiceRoleForRedshift, in your account. If this role doesn’t exist in your account or you need to verify its permissions, see Using service-linked roles for Amazon Redshift.
Create the AWS Glue managed catalog backed by Amazon Redshift managed storage
Because you have configured IAM permissions and Lake Formation settings, you can now create the AWS Glue managed catalog.
Register the catalog as a zero-ETL integration target
To prepare your target AWS Glue managed catalog for zero-ETL integration, use the create-integration-resource-property command with these required parameters:
- The –resource-arn parameter specifies the Amazon Resource Name (ARN) of your AWS Glue managed catalog that will serve as the integration target.
- The –target-processing-properties parameter requires the ARN of an IAM role that has describe permissions on the target AWS Glue managed catalog.
You can use the GlueDataCatalogDataTransferRole created in the earlier step because it already includes the minimal describe permissions needed for this integration. Alternatively, you can create a new IAM role specifically for this purpose and attach the necessary minimal permissions to meet your company’s security requirements.
Example output:
Configure authorization for inbound integration requests
The last step in creating a target managed catalog is to define a resource-based access policy that authorizes zero-ETL integration to push data into your catalog. This policy grants AWS Glue the necessary permissions to create and authorize incoming integration requests from your source database. Apply this resource policy by using the AWS Glue put-resource-policy API call to complete the catalog configuration for your zero-ETL integration:
Your AWS Glue managed catalog is now ready to receive data from the zero-ETL integration.
Load data in the source Aurora PostgreSQL database
Now that your Aurora PostgreSQL database is configured and ready, you must populate it with sample data that serves as the historical baseline for your zero-ETL integration. This first dataset provides the foundation for testing and demonstrating the integration capabilities. After you set up the zero-ETL integration, subsequent database changes stream automatically in near real time to your target AWS Glue managed catalog.
Connect to the source Aurora PostgreSQL cluster
Use the following commands to create a connection to your source Aurora PostgreSQL cluster:
Create a database and table
Create a table named products to store product information:
Insert historical data
Use the following code to insert a row:
This table serves as a representative dataset to demonstrate the data capture and streaming capabilities of the zero-ETL integration. After your zero-ETL integration is active, all database changes, including inserts, updates, and deletes, are automatically captured and streamed to your AWS Glue managed catalog. This creates a data pipeline from your Aurora PostgreSQL database to your Amazon SageMaker for real-time analytics on your operational data.
Create a zero-ETL integration
Because your Aurora PostgreSQL database is now populated with historical data, you can set up the zero-ETL integration that continuously streams database changes to your AWS Glue managed catalog backed by Amazon Redshift managed storage.
Create the integration
Create the integration between your source PostgreSQL database and target AWS Glue catalog by using the aws rds create-integration AWS CLI command. You can customize the integration by specifying added configurations, such as data filters, to control which data gets replicated to your target environment:
When you run the command, the zero-ETL integration begins provisioning and enters a ‘creating’ state. The AWS CLI response provides key details about the integration configuration.
Example CLI output:
When the integration status changes to “active”, your zero-ETL integration pipeline is fully operational.
Monitor the integration
Before generating new live data, verify that the integration has reached an “active” state by running the describe-integrations AWS CLI command. This monitoring step is important to confirm that changes from your source Aurora cluster are successfully streaming to the AWS Glue managed catalog without errors:
Verify the zero-ETL integration
Now that your historical data is loaded and the zero-ETL integration is “active”, you must confirm that the data has been successfully replicated.
Grant Lake Formation permissions
Before you can query the AWS Glue managed catalog by using the Amazon Redshift Data API, you must make sure the IAM user or role has the right permissions to create and manage tables within the catalog. Use the Lake Formation grant-permissions API to provide these necessary permissions so that Amazon Redshift can access your AWS Glue managed catalog for the zero-ETL integration. For more information, see Creating an Amazon Redshift managed catalog in the AWS Glue Data Catalog.
These permissions allow for query execution and metadata inspection on the managed catalog.
Query historical data by using the Amazon Redshift Data API
With the necessary permissions in place, you can now verify your historical data by querying the AWS Glue managed catalog through the Amazon Redshift execute-statement Data API. Begin this verification process by running a SELECT statement against the catalog:
The following command returns a unique query ID that you can use to monitor the execution status and retrieve results from your query:
Monitor your query’s progress by using the describe-statement API with the query ID. Continue checking until the status shows that your query has completed successfully:
To complete the verification process and view your historical data now available in Amazon SageMaker AI, retrieve the query results by using the get-statement-result API call:
With your zero-ETL integration now active, you can demonstrate real-time data streaming by adding new data to your source Aurora PostgreSQL instance. Run the following INSERT query to add a new row, which shows how changes are automatically replicated in near real time:
You can verify that the recent changes from your source database have been replicated to the target environment within seconds. Use the same Amazon Redshift Data API workflow you used earlier to confirm the real-time replication:
Use the describe-statement API call to monitor the query execution and confirm that the status shows ‘FINISHED’ before proceeding to retrieve the results:
Finally, retrieve the query results by using the get-statement-result API call:
This verification process confirms that your zero-ETL integration from Aurora PostgreSQL to Amazon SageMaker AI is working and continuously replicating both historical and real-time data. Although zero-ETL integration significantly simplifies data replication, it’s important to understand certain limitations on supported data types, schema change handling, and data filtering capabilities. For more details about these considerations and best practices, see Aurora zero-ETL integrations and Amazon RDS zero-ETL integrations.
Clean up
This section guides you through the cleanup process to remove the resources and components you created during this walkthrough. When you delete a zero-ETL integration, Amazon Aurora removes it from the source Aurora DB cluster. Your transactional data isn’t removed from Amazon Aurora or the analytics destination, but Aurora doesn’t send new data to Amazon SageMaker AI.
Delete the zero-ETL integration: Begin the cleanup process by removing the integration between your source Amazon Relational Database Service (Amazon RDS) database and the AWS Glue managed catalog. Run the following command to delete the integration:
Delete the AWS Glue managed catalog: After you successfully delete the integration, delete the AWS Glue managed catalog that served as your zero-ETL target destination. Use the following command to remove the catalog:
This permanently removes all associated table metadata and Amazon Redshift managed storage references.
Delete the Aurora DB cluster: If you created the source Aurora DB cluster for this demonstration and you no longer need it, you can complete the cleanup by deleting the entire DB cluster. By skipping the final snapshot option, you avoid retaining any test data and confirm complete resource removal:
Conclusion
In this post, you learned how to configure zero-ETL integration between Aurora PostgreSQL and your Amazon SageMaker AI using AWS CLI. This integration automatically replicates your PostgreSQL data to a lakehouse in near real time, removing the need for custom ETL pipelines.
As you move forward, consider expanding this zero-ETL approach to more supported data sources, such as Amazon RDS for MySQL and Amazon DynamoDB. This creates a centralized data access strategy across your company. You can also explore advanced analytics scenarios by combining zero-ETL integrations with Amazon Redshift capabilities. These include large-scale SQL analytics, Amazon Redshift ML for in-database ML, and federated queries that span multiple data lakes and warehouses. These integrations provide the foundation for building a near real-time data platform that scales with your business needs.
To get started, see the AWS zero-ETL documentation for setup guidance, supported configurations, troubleshooting integrations, and architectural best practices.
Related posts and references:
- Amazon Aurora
- AWS Management Console
- Amazon Aurora tutorials and sample code
- Amazon Aurora zero-ETL integrations